Closeout is the stage where a flooring job either feels truly finished or starts leaking time. One missed transition, one wrong lot, or one missing moisture test can prevent reaching substantial completion, holding up final payment and triggering an unnecessary callback.
That pressure is higher in 2026. The newest flooring trends and products are moving fast, industry standards keep shifting, and the final walkthrough has to catch more than just surface scratches. A professional construction project relies on a comprehensive flooring punch list to keep the job moving without letting small misses turn into expensive delays.
Key Takeaways
- Prioritize Substrate Quality: Always verify moisture readings, flatness, and environmental conditions before installation, as these foundational factors directly influence the floor’s long-term performance and appearance.
- Strict Product Alignment: With the rise of complex 2026 trends and varied product textures, it is critical to confirm the delivered SKU, lot number, and pattern against the approved sample to prevent installation mismatches.
- Focus on Finishing Details: Most callbacks originate at transitions, edges, and junctions; ensure all thresholds are flush and expansion gaps are correctly handled to maintain a clean, professional aesthetic.
- Document Everything: Robust paperwork—including moisture test results, installation logs, and photo documentation—is essential to satisfy warranty requirements and protect against future liability.
- Adopt a Proactive Walkthrough Process: Implementing a rolling punch list and conducting internal walkthroughs before the client inspection prevents minor oversights from becoming expensive, project-delaying issues.
Why closeout matters more in 2026
Annual flooring shows keep the calendar packed, and the product mix keeps getting wider. Buyers are seeing warm neutrals, herringbone layouts, matte finishes, wide planks, waterproof systems, and hybrid resilient floors in the same season. Flooring manufacturing factories are also pushing more color variation and texture, which makes the delivered product easier to mix up if the jobsite paperwork is thin.
That matters because the market is moving faster than the old install cycle. Recent flooring industry news has centered on hybrid resilient flooring, low-VOC products, waterproof options, and patterned wood looks. Today, every general contractor and their subcontractors must align early on these complex product mixes to ensure the vision matches the install. A successful project closeout is now more vital than ever, as the speed of a modern construction project lifecycle leaves little room for error. Even simple rooms now carry more detail, because a contractor may be checking a stone-look LVT bath, a wide-plank oak living room, and a carpeted bedroom on the same walk through a construction project.
A flooring closeout checklist has to keep up with that pace. The room may look finished, but the job is not finished until the substrate, layout, finish, transitions, and paperwork all agree with the spec.
The flooring punch list checklist that keeps closeout moving
If your team wants a general framework first, Construction Punch List Best Practices and Construction Punch List: Guide, Template & Best Practices are useful starting points. Flooring closeout needs a tighter lens, but the workflow stays the same: identify, assign, verify, and sign off. When organizing your punch list items, focus on these critical areas:
| Checklist area | What to confirm | Common miss |
|---|---|---|
| Subfloor and environment | Moisture readings, flatness, cure time, room temperature, humidity | The room looks fine after base hides the slab |
| Product and layout | SKU, lot number, sheen, texture, pattern direction, border lines | The delivered material does not match the approved sample |
| Trim and transitions | Thresholds, reducers, stair noses, caulk lines, expansion gaps | Small edge defects disappear under furniture or cabinets |
| Cleanup and handoff | Debris, adhesive haze, protection, maintenance docs, photos | The floor is done, but the file is not |
That table covers the issues most likely to create a comeback. It also keeps the closeout walk focused on facts instead of impressions.
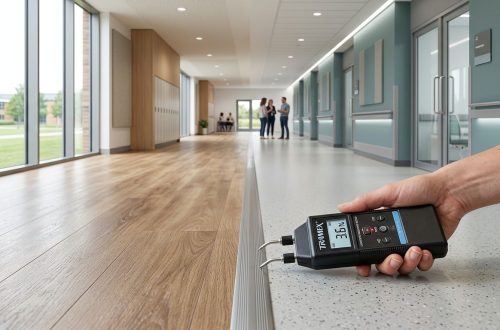
Start with the slab, moisture, and room conditions
The slab is the first thing to confirm, not the last. If the substrate is off, the floor finish will advertise the problem later. For LVP and other resilient floors, even a slight ridge or dip can become a visible issue once sunlight hits the room.
Measure moisture, check flatness, and note temperature and humidity before anyone signs off. If you need a deeper reference for prep work, leveling concrete subfloors before installation is the right place to start. Proper quality assurance during the slab check prevents future structural deficiencies that might otherwise go unnoticed. This check matters on repairs too, because a patch that looks dry can still shift under traffic.
A closeout walk should catch what trim and furniture can hide, not just what the eye sees at the door.
Verify the installed floor matches the approved sample
This is where 2026 gets interesting. The newest flooring products often come with stronger visual variation, deeper embossing, or more natural-looking matte finishes than older lines. Whether you are installing wood flooring or high-end tile flooring, confirming the aesthetic against the contract specifications is vital.
Check the SKU, lot, floor finish, and plank width against the signed sample to ensure they align with the scope of work. If the job called for herringbone, chevron, or a custom border, make sure the pattern lands where the drawing showed it. A double herringbone or oversized plank layout will look wrong fast if the field drifts even a little.
This is also where flooring trends matter in a practical way. A room with a stone-look LVT, a wide oak plank, or a patterned hardwood border needs more than a quick glance. The installer should verify that the delivered material matches the style that was approved during ordering, especially when the job started with samples seen at annual flooring shows or through a distributor display.
Check edges, transitions, and finishing details
Most callbacks do not start in the center of the room. They start at the edges. Transitions squeak, reducers rock, stair noses sit proud, and caulk lines shrink after final cleaning. Those details are small, but they control whether the job feels complete.
Walk every doorway and every material change. Confirm that transitions are flush, expansion gaps are covered but not pinched, and baseboards or quarter round sit tight without gaps. Doors should clear the surface, vents should sit correctly, and trim should not hide a crushed edge or a chipped plank.
This matters even more on jobs that mix surfaces. A kitchen with waterproof flooring, a hallway with hybrid resilient planks, and a bedroom with carpet all meet in the same closeout path. When those junctions are neat, the whole project looks disciplined. When they are not, the eye goes straight to the flaw.
Finish with paperwork that protects the job
A floor can look perfect and still fail closeout if the file is weak. Save the moisture test results, the flatness checks, the product labels, the lot numbers, and the install instructions used on site. You must also include thorough photo documentation of perimeter gaps before baseboards are installed, plus finished photos after final cleaning is completed.
If the job includes vinyl, review LVP warranty requirements and common pitfalls before final acceptance. Warranty claims often get stuck on documentation, not craftsmanship. Missing test results, hidden defects, or a skipped inspection on damaged planks can turn a simple service call into a denied claim.
Good closeout paperwork also helps the next job. It tells estimators what was ordered, what arrived, and what changed in the field. That record becomes even more useful when material comes from different flooring manufacturing factories or when a supplier swap happens late in the project.
A fast closeout walk that works under pressure
Rolling punch lists keep the end of a project from turning into a single rushed inspection. The Construction Punch List Process Explained makes the same point well, start early, stay organized, and keep the list alive while the work is still easy to fix.
Before the official client inspection, your project manager should perform an internal walkthrough to identify issues early. Use digital tools or construction management software to log any defective work and track punch list items in real time.
Use this order on flooring jobs:
- Walk the space with the installer and supervisor present, ensuring all subcontractors are aware of their responsibilities, including minor paint touch-ups near the floor edge.
- Mark issues with photos, room names, and one owner for each fix.
- Rewalk the room after corrections, before anyone signs the final sheet.

That simple sequence keeps the closeout list from becoming a memory test. It also works on bigger jobs, where multiple rooms, multiple crews, and multiple product types all need separate review.
What a strong closeout looks like on the floor
A clean closeout feels boring in the best way. The transitions are quiet, the edges are straight, the paperwork is complete, and nobody has to guess what happened on site. When the site inspection confirms that every detail meets the project specifications, the transition to substantial completion becomes a smooth, predictable process. This level of organization is the final hurdle before your team can secure the release of final payment and retention funds, ensuring that all financial obligations are cleared without unnecessary delays.
That is especially important in 2026, when flooring industry news keeps showing more pattern work, more waterproof systems, more matte finishes, and more product variety at annual flooring shows. These trends look good on the sales side, but they also raise the odds of a mismatch if closeout is rushed. By maintaining a rigorous standard during the final walkthrough, you protect the project from the complexities introduced by modern product variety and ensure your bottom line remains intact.
Frequently Asked Questions
When is the best time to start the flooring punch list?
You should start the punch list process early by performing internal walkthroughs while work is still in progress rather than waiting for the final project closeout. This proactive approach allows you to identify and correct issues while the installers are still on-site, minimizing delays.
Why is moisture testing essential for a successful closeout?
Moisture testing confirms that the subfloor is adequately cured and stable, preventing long-term structural failures like warping or adhesion issues. Without this documentation, you risk voiding manufacturer warranties and face potential callbacks when hidden moisture impacts the new flooring finish.
How can I avoid mismatches between samples and installed products?
Always verify the SKU and lot numbers on the packaging against the project specifications and approved physical samples before installation begins. In 2026, many products feature significant color and texture variation, making early verification crucial to ensuring the finished floor matches the client’s vision.
What should be included in the final closeout documentation?
The closeout file should contain moisture and flatness test results, product labels, lot numbers, installation instructions, and comprehensive photos of the site. This documentation acts as a vital record for both future maintenance and warranty claims, protecting the project team after the client takes possession.
Conclusion
Closeout is where a flooring project either protects your profit margins or gives them away. When your flooring punch list covers every detail from substrate preparation and product matching to edges, cleanup, and project documentation, the final walkthrough feels controlled rather than rushed.
Managing these punch list items proactively is the best way to prevent an unexpected change order from surfacing late in the process when costs are highest. This level of diligence is essential in 2026, as the market continues to demand faster product cycles and more complex visual standards. A sharp, organized approach to the final walkthrough catches the small defects that often hide under baseboards or thresholds, ensuring that your project closes successfully and your reputation remains intact.