A concrete slab can look dry, feel hard, and still hold enough moisture to wreck a luxury vinyl plank (LVP) install weeks later. That’s the trap. Moisture moves like smoke, it finds the path of least resistance, and it doesn’t care how good the planks look on day one.
If you’re bidding or installing LVP over concrete, concrete moisture testing isn’t an optional line item. It’s how you avoid bubbles, moldy smells, adhesive failures, and callbacks that eat the whole job’s profit.
This guide focuses on practical ways to spot hidden slab moisture early, then confirm it with the right tests before you commit to installation.
Why hidden slab moisture shows up after LVP goes in
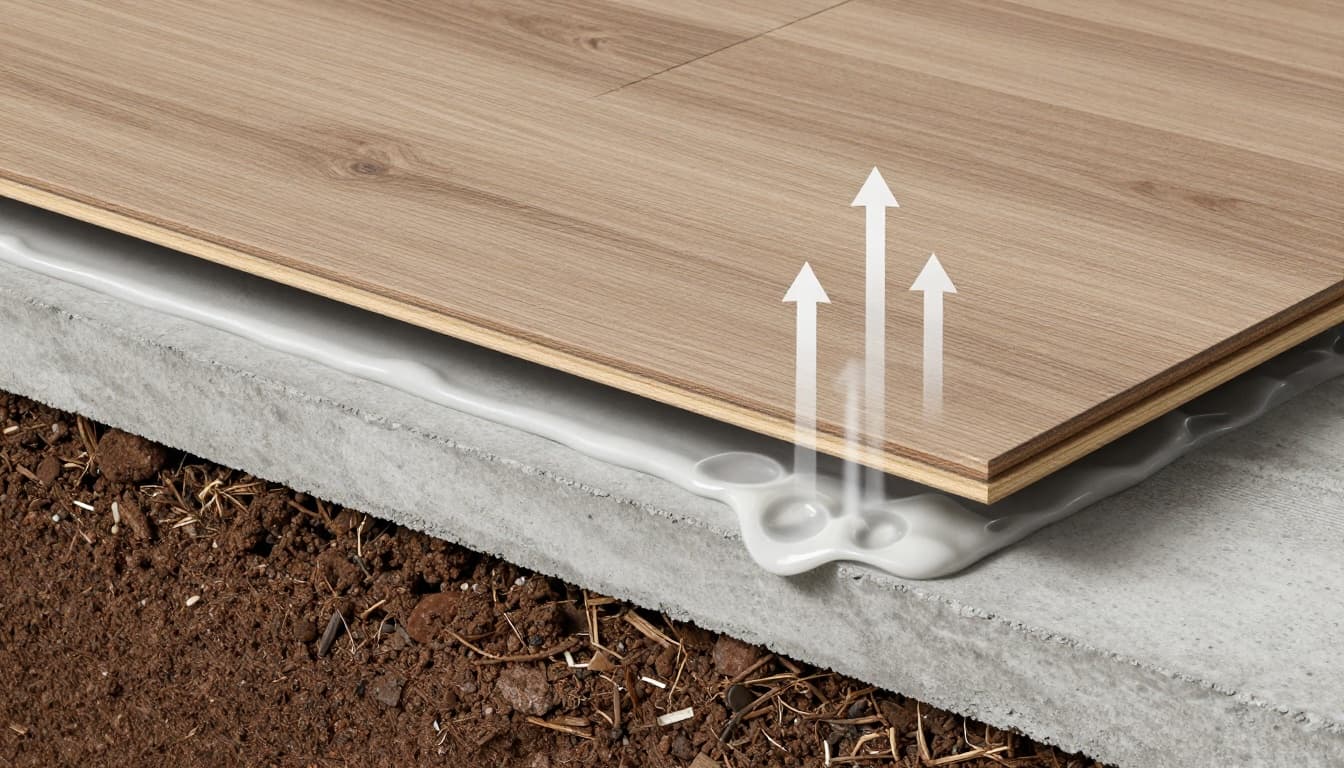
LVP is often marketed as “waterproof,” but that claim usually applies to spills from above, not moisture vapor pushing up from below. When a slab is too wet, vapor pressure builds and moves into the flooring system. Depending on the install method, you can see:
- Adhesive breakdown on glue-down LVP (soft, gummy, or powdery adhesive)
- Curling, peaking, or edge lift at seams
- Haze or moisture beads trapped under underlayment or poly
- Musty odors that show up only after the space is closed in
- Discoloration at joints or around exterior walls
Moisture problems also don’t “average out.” One damp strip near a patio door can trigger failure in a small zone, then spread as traffic and cleaning force moisture sideways.
For deeper background on how slab moisture causes flooring failures and why test selection matters, IFTI’s overview is a solid reference: The Complete Guide to Moisture Testing in Concrete.
Quick ways to spot moisture risk before you break out test kits
Read the room before you read the slab
Hidden moisture often leaves clues. On your first walk, slow down and look for patterns:
Moisture-prone zones: exterior walls, sliding doors, below-grade rooms, slab edges, plumbing walls, and any area that recently had wet carpet pad.
Visual hints: darkened concrete, patchy sheen, efflorescence (white salts), peeling paint at base walls, or old tack-strip stains that look “reactivated.”
Smell and air feel: a damp, earthy odor or “heavy” air can point to high indoor RH. Even if the slab is borderline, high ambient humidity can push a floating system over the edge.
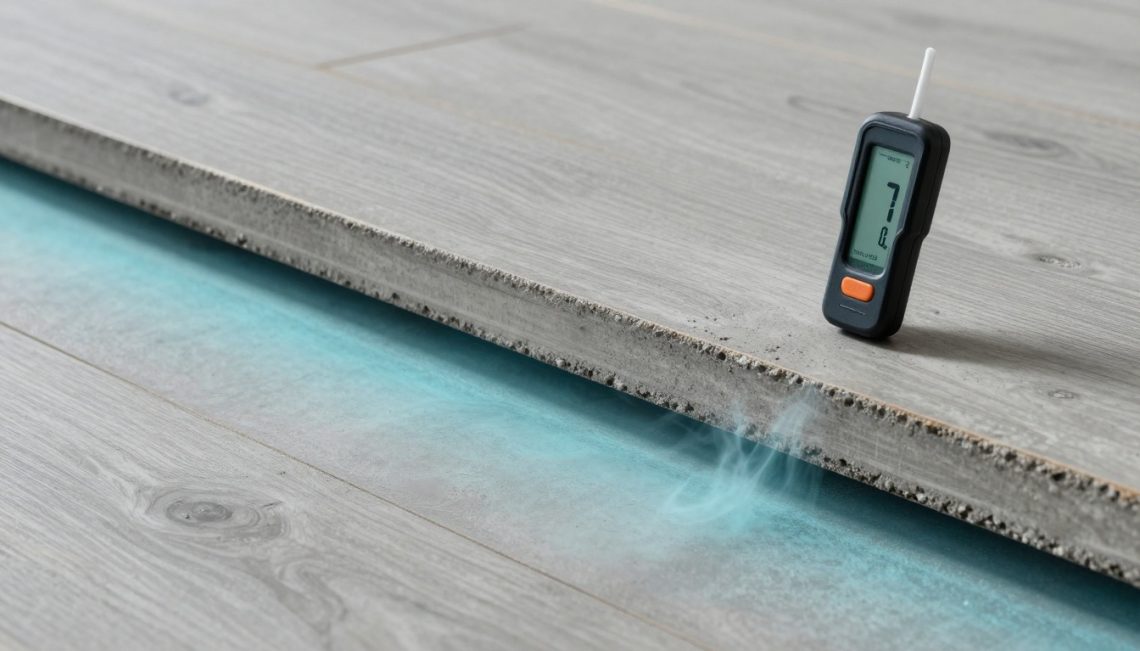
Map the slab with a pinless meter (screening, not final proof)
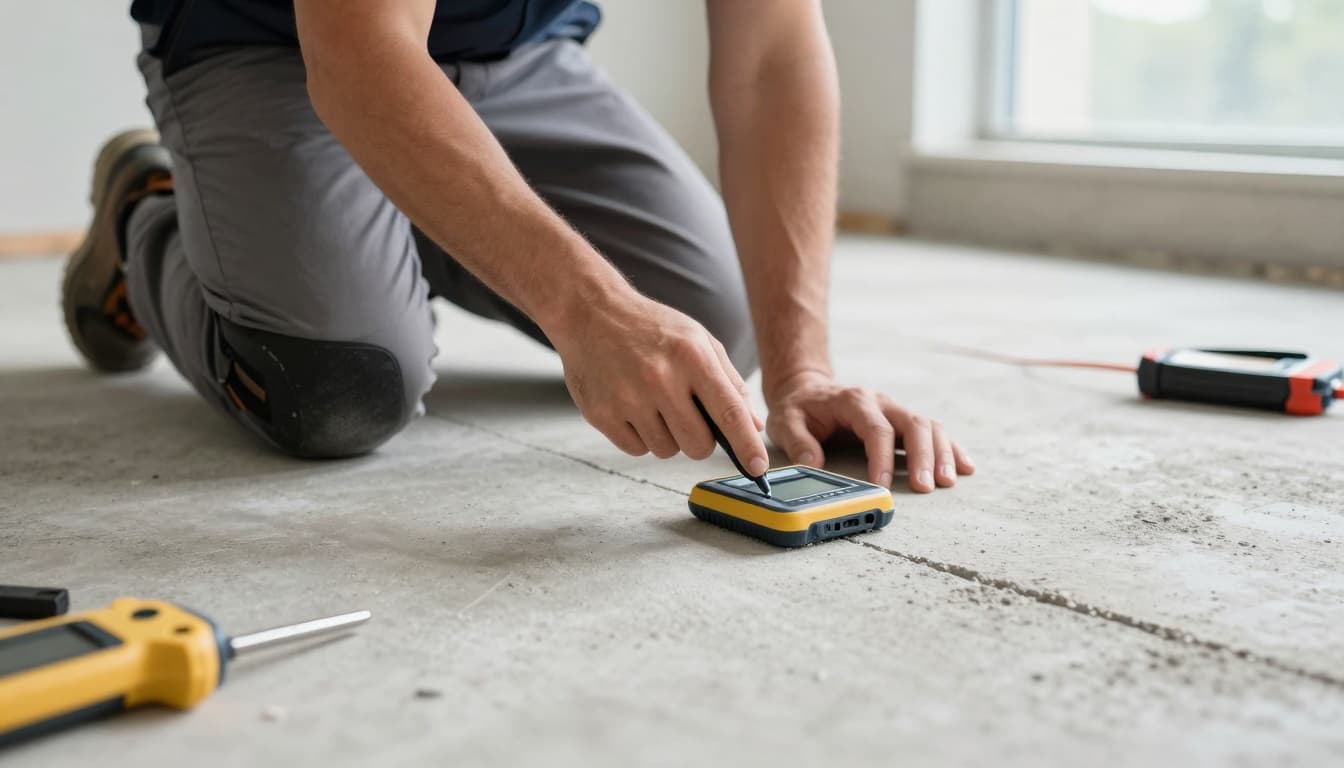
A pinless concrete moisture meter is a fast way to find “hot spots” and build a moisture map. Think of it like a smoke detector, it warns you there’s an issue, but it doesn’t tell you the full story.
Good uses on LVP jobs:
- Compare slab edge vs center
- Compare patched areas vs original slab
- Identify wet strips near doors or plumbing
- Decide where to place your “real” tests (RH probes or MVER kits)
Key habit: take consistent readings in a grid, then mark suspect areas with tape. Your goal is repeatable relative data, not a magic pass/fail number.
Use thermal imaging to find “cooler” damp zones
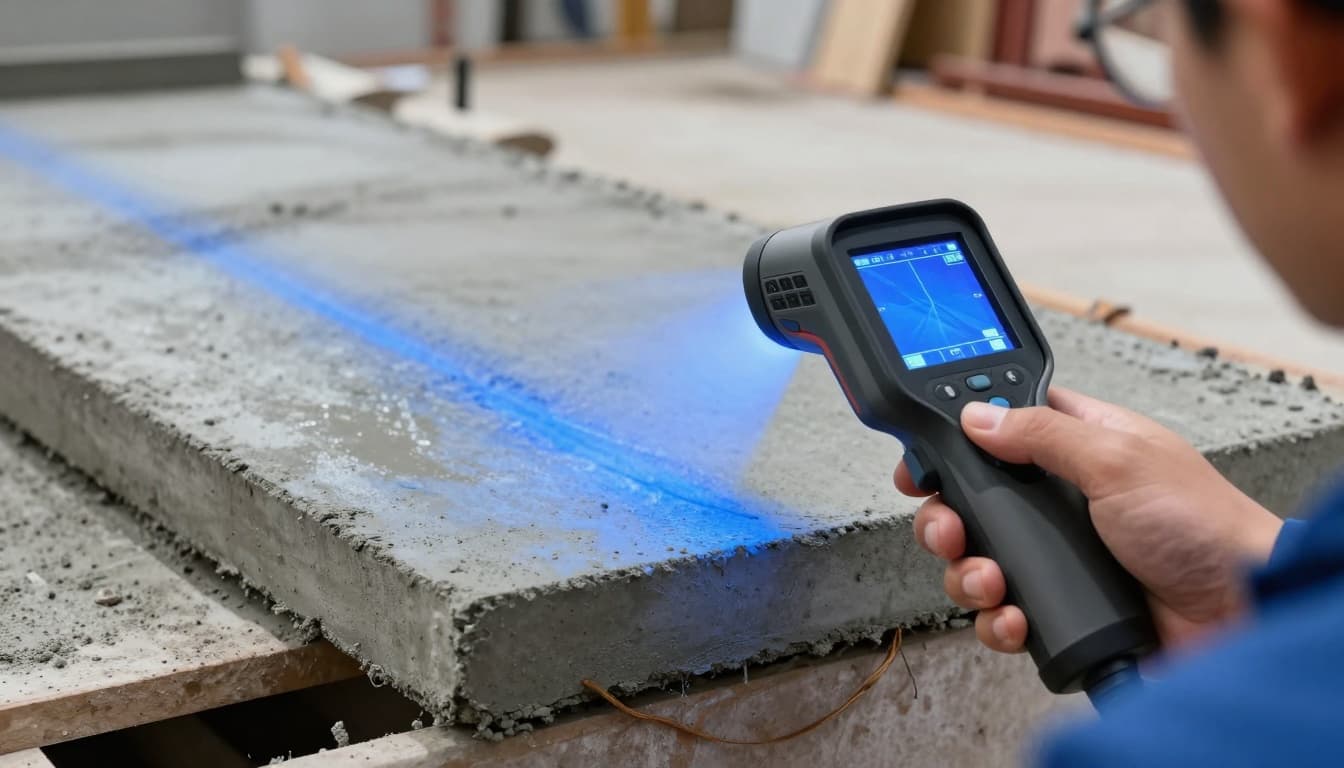
Moist areas often read cooler due to evaporation. An infrared camera can quickly highlight odd shapes and temperature breaks that don’t match framing lines.
What it’s good for:
- Finding moisture patterns under old flooring footprint
- Flagging damp pathways from exterior walls
- Checking after a rain event or plumbing repair
What it’s not: a stand-alone pass/fail moisture test. Use it to choose where to confirm with standardized methods.
If you want a short overview of common test approaches (and why coatings and flooring installs fail when moisture is ignored), this guide is helpful: 3 Ways to Test Concrete for Moisture.
Confirm hidden moisture with ASTM-grade testing (the numbers that matter)
Screening tools point you to risk. Concrete moisture testing for warranty decisions usually comes down to standardized tests and manufacturer limits.
In-situ RH testing (ASTM F2170)
In-situ relative humidity (RH) measures moisture conditions inside the slab, which is closer to what the flooring system will experience after installation.
Practical tips that prevent bad data:
- Place probes in the highest-risk zones plus at least one “normal” zone for comparison.
- Follow the kit instructions on hole prep and equilibration time.
- Record site conditions (temperature and ambient RH) when you log readings.
RH is often the test that settles arguments because it’s less influenced by short-term surface drying.
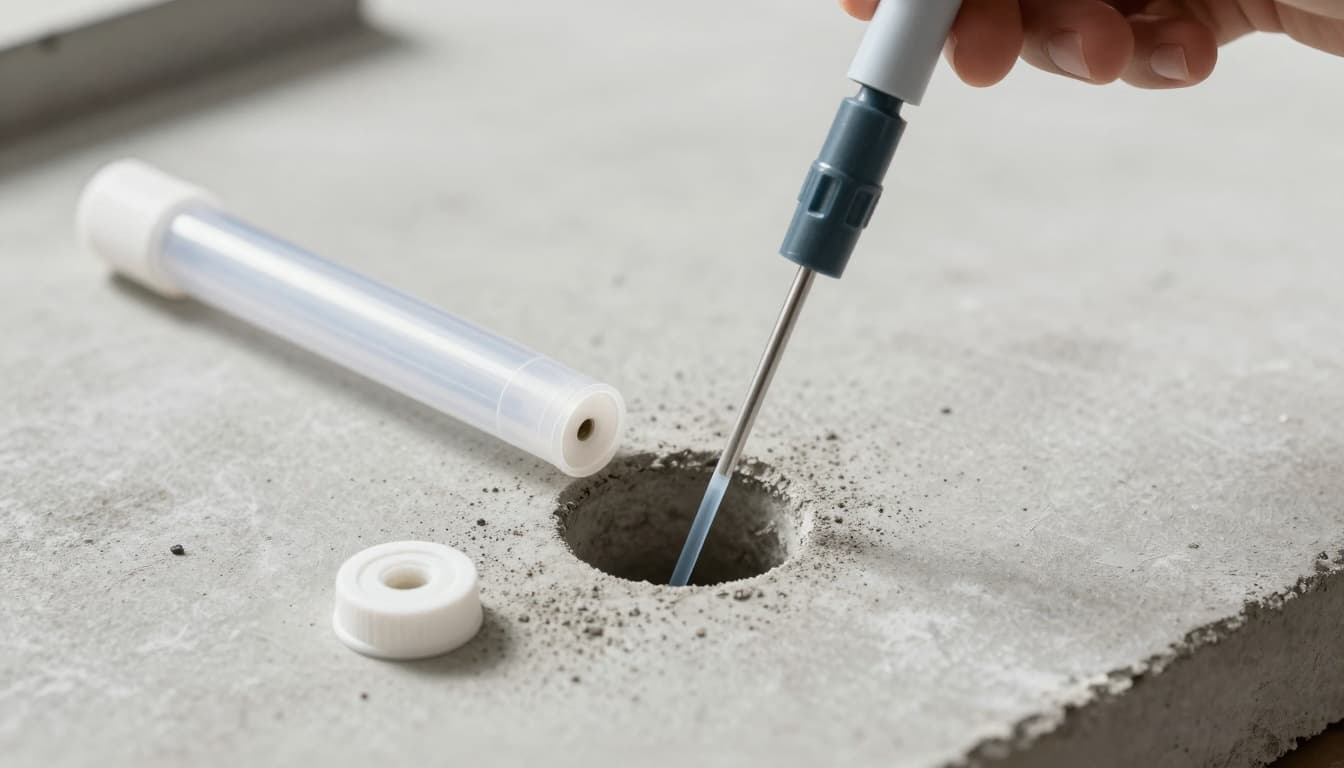
Calcium chloride MVER testing (ASTM F1869)
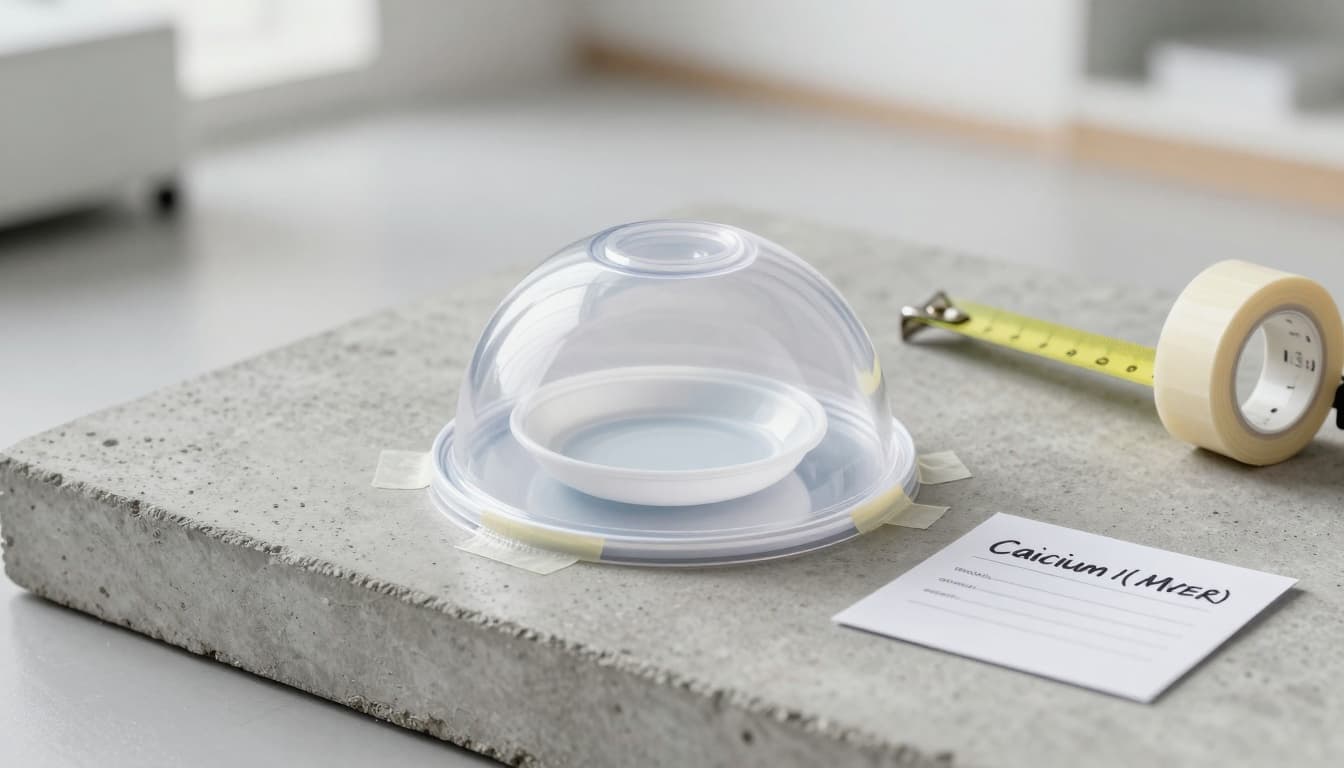
The calcium chloride test estimates moisture vapor emission rate (MVER) from the slab surface over a set time. Many specs still call for it, especially on adhesive jobs.
It’s sensitive to surface prep, sealing, and room conditions, so treat it like a controlled procedure, not a “stick it down anywhere” kit.
Which test should you use?
| Method | Best for | What it tells you | Common mistake |
|---|---|---|---|
| Pinless meter | Fast screening | Relative wet vs dry areas | Using it as final approval |
| In-situ RH (F2170) | Warranty-level decisions | Moisture inside slab | Poor hole prep or placement |
| Calcium chloride (F1869) | Surface emission rate | Vapor emission at surface | Skipping room conditioning |
| Thermal camera | Finding patterns | Temperature anomalies linked to moisture | Calling it “proof” |
Always defer to the LVP and adhesive manufacturer’s published limits. If they specify RH, don’t substitute MVER, and vice versa.
For installers who want a plain-language breakdown of acceptable ranges and common vinyl-related issues, this article is a decent explainer: Acceptable Moisture Content In Concrete For Vinyl Flooring.
Avoid false confidence: common ways crews misread slab moisture
Bad decisions usually come from shortcuts that “feel right” on site:
The slab feels dry: surface dryness can hide deep moisture. A warm HVAC cycle can dry the top fast, while the slab body stays wet.
Plastic sheet test only: condensation under plastic can hint at moisture, but it’s too crude to sign off a job. Use it as a warning flag, not documentation.
Testing too early: slabs and patches need time. Even if the schedule is tight, testing before the building is conditioned can give numbers that shift after occupancy.
Ignoring micro-zones: one wet strip can fail a glue-down perimeter, even when the center of the room “passes.”
If the slab is wet: mitigation options that protect the install (and your profit)
When tests come back high, you have decisions to make, and each affects warranty exposure.
Moisture mitigation coating: Often the cleanest fix for chronic vapor drive (when installed per system spec). Surface prep is everything. Shot blasting and patch compatibility matter as much as the coating.
Floating LVP with a rated vapor barrier: This can work when the manufacturer allows it and the slab is flat enough. Watch seams, perimeter sealing, and transitions.
Choose adhesives designed for higher RH: Adhesive chemistry keeps changing. In early 2026, the industry has been talking about updated formulations aimed at better bond performance under real jobsite conditions, including moisture. This overview frames the direction of the category: Adhesives: New formulations help floors stick.
Fix the source when possible: gutter issues, grading, missing vapor retarder, or ongoing plumbing seepage will keep feeding the slab. Mitigation without source control is a gamble.
Flooring industry updates to watch in 2026 (and why it matters on moisture jobs)
Install failures aren’t just technical, they’re also tied to expectations set by flooring factories, warranties, and what’s being discussed in flooring industry news.
Two updates worth tracking:
- Shaw Industries reported it developed a new method to detect PFAS in manufacturing inputs after finding common test protocols didn’t fit many non-water materials. That signals tighter scrutiny on what goes into flooring systems and how performance claims get verified: Shaw develops new testing method to detect PFAS in manufacturing materials.
- The NTCA posted a January 2026 schedule packed with free workshops and regional training sessions, a reminder that installation education is still one of the best defenses against costly moisture mistakes: NTCA Announces January 2026 Education & Training Schedule.
For a flooring business, staying current with flooring news, flooring trends, and the newest flooring products and trends also means keeping up with new flooring techniques for testing, documenting, and mitigating slab moisture.
Conclusion
Hidden slab moisture is like a slow leak behind drywall, you don’t see it until damage shows up. The cure is a repeatable process: screen the slab, confirm with standardized tests, and match your install system to the numbers.
Do concrete moisture testing early enough to change the plan, not late enough to argue about blame. The jobs that stay profitable are the ones where moisture risk is measured, documented, and handled before the first plank clicks in.