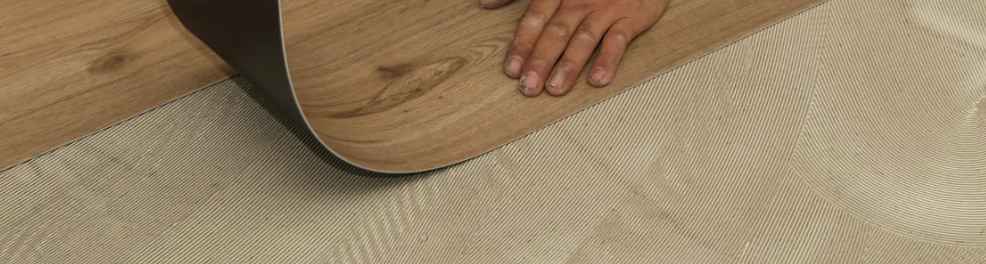
Bubbles in flooring in a glue-down vinyl plank flooring install aren’t “mystery movement.” Most of the time, they’re a message from the adhesive layer about installation mistakes: wrong amount, wrong timing, wrong pressure, or a slab that wasn’t ready.
For crews doing glue-down LVP on concrete installs, the goal is simple. Build a bond that’s even, consistent, and repeatable across rooms, shifts, and jobsite conditions. That means treating the trowel notch like a calibrated tool, respecting open time like a clock you can’t pause, and rolling like it’s part of the install, not cleanup.
Concrete subfloor preparation that prevents bubbles before the bucket opens
Subfloor preparation goes beyond a surface that looks clean. Concrete is rarely “ready” just because it looks clean. Glue-down LVP is thin enough to telegraph problems, and strong enough to pull against weak surface layers. If the top of the slab is dusty, chalky, sealed, or contaminated, the adhesive can skin over, fail to wet out, or lose tack in patches. Those weak pockets are where bubbles like to start.
Moisture is the other silent driver. A slab can feel dry and still push vapor, especially on slab-on-grade, lower levels, or newer pours. Use a moisture meter for jobsite testing and documentation of the slab’s state. If your team needs a refresher on jobsite testing and documentation, this guide on subfloor moisture testing before LVP install is a solid baseline for what to log and how to interpret results without guessing.
Three practical prep habits cut bubble calls fast:
- Get the slab profile right: Grinding high spots, cleaning the subfloor by removing paint and overspray, and using a compatible leveling compound (fully cured) keeps the adhesive film uniform.
- Match primer to substrate porosity when required: Porous concrete can drink adhesive and shorten open time. Non-porous slabs can do the opposite and trap solvents or moisture at the surface. Follow the adhesive maker’s system, not a “one primer fits all” habit.
- Follow the acclimation process: Ensure planks are ready for the jobsite environment to prevent movement issues that lead to bubbles.
A glue-down floor bonds to the slab, not to dust, not to a weak skim, and not to wishful thinking.
Trowel Notch Size and Open Time: Control the Adhesive Film, Control the Outcome
With glue-down LVP, the notched trowel in your adhesive application serves as the thickness gauge. Too much adhesive can stay wet too long, migrate, or create soft ridges that later show up as trowel mark show-through, bubbles, and raised edges. Too little adhesive can starve the bond and let planks “float” on isolated contact points.
Manufacturers spell this out for a reason. Manufacturer instructions, like Armstrong’s commercial guidance, explain why the recommended trowel matters, because notch size controls adhesive volume and performance: Adhesives FAQs.
Since notch specs vary by adhesive chemistry and plank backing, treat these as categories, then verify the exact trowel on the pail or data sheet:
| What you’re trying to solve | Typical notch direction (verify with label) | What it affects |
|---|---|---|
| Prevent bleed-through and soft spots | Smaller, fine V-notched trowel | Thinner film, faster tack, less ridge collapse |
| Maintain full transfer on textured backings | Slightly larger U-notched trowel | Better wetting, higher transfer, longer working time |
| Keep spread consistent across a big area | New trowel, sharp notches | Predictable spread rate, fewer dry pockets |
Now pair notch control with adhesive open time. Adhesive open time, or working time, is the window where adhesive is ready to receive LVP. It changes with slab temperature, air movement, humidity, and porosity. In practice, most failures happen at the extremes:
- Too wet: plank slides, adhesive ridges slump, and trapped wet pockets can later expand or release. Aim for the adhesive to be dry to the touch before laying planks.
- Too dry: adhesive skins, transfer drops, and you get spot bonding that can bubble under traffic.
If you want a simple checklist style reference for glue-down LVP jobsite expectations (including rollers and general workflow), see EverStep’s LVP glue-down installation guidelines.
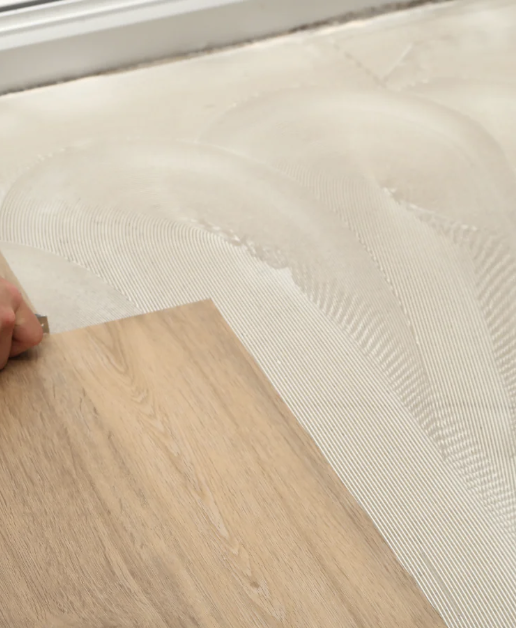
Rolling the Floor for Glue-Down LVP, Plus the 6 Adhesive Mistakes That Cause Bubbles
Rolling is not optional. Think of pressure-sensitive adhesive like mortar under a tile. You don’t get a real bond until the material is pressed into contact and the adhesive ridges collapse into a continuous film. Many installation guides call for a 100-pound roller, and the point is consistent pressure across the whole field.
A reliable rolling routine is short, but it has to be disciplined:
- Roll in both directions (lengthwise, then crosswise) to collapse adhesive ridges evenly.
- Roll at the right time: after placement, while the pressure-sensitive adhesive is still in its bonding window.
- Re-roll high-traffic zones if the adhesive maker calls for it, especially around seams and entries.
Bubbles usually trace back to one of these six adhesive mistakes:
- Wrong notched trowel (or a worn trowel): Notches round off quickly on concrete. A “correct” notched trowel that’s worn acts like a smaller notch, starves coverage, and creates patchy bonding.
- Spreading too far ahead: Open time gets away from you. The back half of the spread is ready, the front half is skinned over, and the floor behaves like it was installed over mixed adhesives.
- Installing into adhesive that’s too wet: This traps wet ridges and creates soft zones prone to excessive indentation and bond failure. Later, traffic and heat can move that adhesive and puff the plank.
- Contaminated slab surface: Dust, drywall mud, paint mist, curing compounds, and even sweeping residue can stop transfer. You end up bonding to debris that breaks loose.
- No rolling, or “spot rolling”: Hand rollers at seams don’t replace field pressure. Uncollapsed ridges are future bubbles, especially on wider planks.
- Not managing temperature and humidity: Fans, direct sun, cold slabs, and HVAC cycling can shift open time mid-room. One area grabs, another stays wet, and you get a floor with mixed bond states. Uncontrolled temperature and humidity can also drive plank expansion, causing buckling or movement if expansion gaps are inadequate.
For a current, installer-focused reminder on adhesive handling and jobsite discipline, keep an eye on trade coverage like Pro adhesive tips help installers get a grip. It’s the kind of flooring news that’s practical for training new leads and tightening standard work.
One more safeguard that pays off when there’s a dispute is warranty alignment. Many claims hinge on proof that the system was installed as specified, not just that the floor “looks right.” This post on LVP installation mistakes that void warranties maps the common paperwork and process traps that turn a simple bubble repair into a denied claim.
2026 flooring industry signals: products change fast, adhesives still punish shortcuts
The newest flooring trends and products look tougher every year, but glue-down basics for glue-down vinyl plank flooring haven’t changed. If anything, wider planks, busier visuals, and faster commercial turns have narrowed the margin for error.
In flooring industry news this month, Surfaces is still a key checkpoint for category direction and dealer support strategies. If you track annual flooring shows to anticipate what customers will request next, start with coverage like Surfaces ’26: Supporting retail with strategy makes its mark. That conversation connects directly to what’s happening in flooring manufacturing factories, where product lines keep expanding and installers are expected to execute more systems with fewer callbacks on challenging surfaces like concrete subfloor.
Leadership outlooks also point to discipline and documentation becoming standard, even when demand is uneven. This summary is a useful pulse check: Executive Outlook 2026: Strategy, discipline and the signals flooring leaders are watching now. It’s one reason retailers and contractors are tightening install SOPs around two core pillars, subfloor preparation and manufacturer instructions, alongside selling newest flooring products that promise more performance.
Conclusion
Bubbles in glue-down LVP on concrete are rarely random. They come from film thickness, timing, pressure, and slab readiness, usually in combination. Tighten notch control, respect open time, and roll like you mean it, and most callbacks for bubbles in flooring disappear. The crews that treat adhesive application for glue down LVP concrete as a repeatable process, not a feel-based craft, are the ones that stay profitable as flooring trends and customer expectations keep moving.